Welcome to episode 2 of my Nerdio series!! As my subscribers and followers will know, I am a huge fan of Azure Virtual Desktop and Nerdio has been on my list of services and tools to try for a while now.
This is the second episode in which I deploy Azure Virtual Desktop services via the Nerdio for Manager console. I show how easy it is to provision AVD services, as well as share some of my own insights and experiences. Below is the link to episode 3 so I hope you enjoy….do not forget to like and subscribe!
I have recently started my own YouTube Channel called ‘I am IT Geek’ where I have started to publish video series all around different Microsoft Cloud services – https://www.youtube.com/channel/UCt5sNdu14RterwDfEDEJidQ . It has so far been an amazingly fun experience and I thought I would get my experience down on paper in a blog in case anyone else within the wider online IT community wants to start there own and was not sure how!
Where it all started!?
Almost 12 months ago I took part in the Azure Advent Calendar Azure community initiative where I did a video based on Multi-Factor Authentication – https://www.youtube.com/watch?v=thep3IYzg2k . This was the first time I had dipped my toe into the video content world and it was awfully painful. I spent most of the day recording (a good 8 hours) and found the whole experience of being in front of camera very stressful. The equipment I used at the time was owned by my employer at the time and was pretty good and included a camcorder and multiple mics for optimum sound. The saying ‘All the gear and no idea’ comes to mind and with this being my first experience it was very much the case!
What little did I know that recoding the content was probably the easy part and the fun of editing was to come! Much like the recording of the actual video, at the time it was my first experience editing video content as well. I was lucky enough at the time that a good friend of mine, Neil Roberts, was kind enough to loan me his MAC Book laptop which had some amazing free video editing software on it. I spent hours editing and all in all it was a vey traumatic experience.
I decided at that point that I was not ready to make video content, however less than one year on things have changed! Where as with this fist video, I jumped into it without really doing any research into equipment, watching how other people in the community record theirs or even what software is needed. I made sure I did all of these things this time around and it has made a lot of difference.
Why start video content?
I have been contributing to the Azure and Microsoft communities with mainly blog posts and occasionally taking part in some of the community initiatives like the Azure Spring Clean and the Azure Back to school, however these have again all been blog based. I wanted to contribute more so back in July I presented at my first Azure User Group (Leeds Azure User Group) and due to the COVID situation it was virtual. It was the first time since the YouTube video I was presenting to people on camera and the experience was much different. Obviously there was no editing to be done, however I felt much more comfortable speaking on camera to people and I enjoyed preparing the slides! Since then I have presented at several more User Groups and the more I have done the more confident I have become. However I still felt like I wanted to contribute more, so what was left? Making video content!
How did I go about I differently this time?
As I mentioned earlier, once I made the decision to create YouTube content I invested time in looking into the right type of equipment first. Sound and video are vital so I reached out to others within the online Azure community to see what they had used. In the end I went with:
This mic had great reviews and was also within the budget I had set myself. It has honestly been a god send and removed a lot of the echo I was getting when trying to record without it!
This mic was also essential to making sure the quality of the content was clear. I was lucky enough to be given this as a gift from some friends earlier this year so it was perfect timing!
Software: The first time I was loaned a MAC Book with some free video editing software on it, however I did not have that luxury now. I once again looked to the always helpful online Azure community for advice and I have been using a combination of OBS Studio to record the content and CyberLink Power Director to edit the videos before uploading them into YouTube. OBS studio is free however Power Director is not free. A lot of people recommended Camtasia, however this was again outside my budget, but this may be something I look at using in the future.
Branding: Another aspect I believe to be important but maybe not all people will agree is ensuring you get good branding done. I had been recommended to use an artist called Mary Crews – https://twitter.com/MaryCrewsGFX to get my logo, banner and intro video done and the output was amazing. Having a reliable and talented artist to create the designs and branding was what I believe really helped finish off my channel and presentation content.
Having all the correct kit and branding is of course all pointless if you don’t have any content to share! During my research I watched a lot of channels, including Gregor Suttie’s – https://www.youtube.com/channel/UC6Z6po-HoVP6NEp88KYXSPw, Derek Campbell – https://www.youtube.com/user/Delboy3g and Dwayne Natwick – https://www.youtube.com/channel/UCIWicD_sUxH6EMH4ndG5NxQ to name a few. They all had different methods of sharing content, Derek does more podcast style interviews, Gregor does short, very helpful videos on how to configure and fix cloud related services and Dwayne does video series on a specific topic and breaks them down into episodes. I decided I would do a mixture of all these on my channel at some point. At the moment I have started off by doing Video series based on different topics (currently the Azure MFA series), but I will also be doing some interview style videos as well as some quick short ‘how to’ and quick fix videos as well.
In summary this all really comes down to me wanting to share and contribute more to the Azure/Cloud online community, one that has given so much to me. I feel like I want to repay that and try to help others who are maybe starting on there IT journey like I once was.
Hope you find this helpful, if you would like any more information feel free to tweet me @shabazdarr or ask a question in the comments section below! Until next time, ‘IamITGeek’ over and out!
Welcome to day 15 of the Azure Spring Clean ( https://azurespringclean.com/ )! Big thanks to Joe Carlyle (@wedoazure) and Thomas Thornton (@tamstar1234) for putting this learning initiative together! Today’s Azure Spring Clean post is on ‘My top 10 Azure Security best practices’
Before i get to the the good stuff, a quick point to make which is that the following list is my own opinion based on my experiences from my work and investigation into this subject matter.
Lets get this list started!!! In at No.10…
Number 10:Implement DDoS Protection & Mitigation
DDoS attacks have been around for a while and protecting your Cloud Infrastructure from this type of attack is something I feel is important. DDoS Protection brings massive DDoS mitigation capacity to every Azure region. You scrub traffic at the Azure network edge before it can affect the availability of your service.
The following features are available within the Azure DDoS Protection service:
Turnkey Defense
Adaptive tuning
Attack Analytics
No 9:Using Web Application Firewalls (WAF)
Web applications are increasingly targeted by malicious attacks that exploit commonly known vulnerabilities. SQL injection and cross-site scripting are among the most common attacks. Azure Web Application Firewall (WAF) provides centralized protection of your web applications from common exploits and vulnerabilities.
The following are some core benefits Azure Web application firewall (on Application Gateway) can provide:
Protect your web applications from web vulnerabilities and attacks without modification to back-end code.
Protect multiple web applications at the same time. An instance of Application Gateway can host of up to 40 websites that are protected by a web application firewall.
The Application Gateway WAF is integrated with Azure Security Center. Security Center provides a central view of the security state of all your Azure resources.
Associate a WAF Policy for each site behind your WAF to allow for site-specific configuration
The following are some key features of the Azure Web Application Firewall:
SQL-injection protection.
Cross-site scripting protection.
Protection against crawlers and scanners.
Detection of common application misconfigurations (for example, Apache and IIS).
Configurable request size limits with lower and upper bounds.
No 8:Have a Firewall strategy
When it comes to a Firewall strategy you have two main options:
User Azure Native controls
Use 3rd party Virtual appliances
Azure Native Controls include the Azure Firewall and Web Application Firewall (already mentioned). These offer basic security that is good in some scenarios, with a fully stateful firewall as a service, built-in high availability, unrestricted cloud scalability, FQDN filtering, support for OWASP core rule sets, and simple setup and configuration
3rd party Virtual Appliances normally have more advanced capabilities and are available from the Azure Market Place by 3rd party vendors (WatchGuard for example). Network virtual appliances in the Azure Marketplace include familiar security tools that provide enhanced network security capabilities. Configuration is more complex, but allows you to leverage existing capabilities, and skillets.
No 7: Define Clear lines of responsibility
In many many companies it is common to split IT into different teams (Network team, Server team and so on). I feel it is an important security practice to define responsibilities with in Azure in a similar and use ‘Role Based Access Control’ to give members of the IT team access to only the areas which relate to there job function. Ensuring these responsibilities are clearly defined ensures consistency which helps avoid confusion that can lead to human and automation errors that create security risk.
No 6: Monitor Azure Resources
It is important to constantly monitor your Azure Infrastructure and setup alerting to ensure you are made aware of any potential threats as they occur, rather than when it is too late. For me some key services which should be monitored are:
VMs on Azure (Windows, Linux, and Installed Applications)
Azure Container and Azure Kubernetes Services (AKS)
Azure SQL Database and Azure SQL Data Warehouse
Azure Storage Accounts
IoT Devices
On-premises servers (via Windows Admin Center
No 5: Multi-Factor Authentication for all standard users
In my experience this is something that is very often not implemented until businesses have actually been affected by a security incident. Its is very important to implement MFA for all standard users across the tenant for access to any Azure/Microsoft 365 resources.
No 4: Ensure all IT staff follow strict ‘Change Control’ process
This best practice is something that very few follow and it can lead to a lot of misunderstanding and confusion when issues arise. Cloud platforms like Azure and Microsoft 365 have made it much quicker to make what use to be time consuming changes much faster, however if these types of changes are not documented, vetted and controlled it can cause major security risks.
Implementing strict change control when looking to make charges to settings (such as VM security rules, or a Firewall rule), if the steps the change implementer are documented and approved by a change board before hand it is much easier for other people to investigate any issues the change might cause, or roll back further down the line if required.
No 3: Implement a strict password policy
With the emergence of MFA, regularly implementing password changes is no longer a requirement or best practice. Rather than getting users to change passwords, I feel its better to implement a longer more complex password and only change it once every 365 days. Also ensure simple passwords are prohibited from being implemented, as well as ensuring users cant repeat use similar passwords (for example the same word but with a 1 at the end of it).
No 2: MFA for all Admin users
Regardless of whether you implement MFA for standard users it is even more important to ensure your Admins all use MFA to secure there access to resources. Although a standard user getting hacked is still bad, having a user with elevated privileges compromised has even worse consequences as they have much wider access to key resources which could compromise a business much quicker.
All staff that have any type of Admin access should be using MFA for accessing resources. Also Microsoft themselves recommend having no more than 5 global admin accounts.
No 1: Monitor Security Score
Assign stakeholders to use Secure Score in Azure Security Center to monitor risk profile and continuously improve security posture. In my time using Azure and Office 365, I have seen all to often that businesses do not pay attention to the Secure Portal.
This portal is designed to give you tips and recommendations on how you can improve security within your tenant and compares your score to other similar sizes business to help you understand where your security posture sits against them.
Hope you find this helpful, if you would like any more information feel free to tweet me @shabazdarr or ask a question in the comments section below! Keeping following the Azure Spring Clean until the end of February for loads more great content!!
Salaam, Namaste, Ola and Hello! My name is Shabaz Darr and this is the 6th day of the Azure Advent Calendar ( https://azureadventcalendar.com ). One of my main focuses in my role is Security, which is why I have chosen Azure Multi Factor Authentication as my topic for this blog.
Account passwords are historically one of the easiest security measures to hack, be it via ‘Brute Force attacks’ or users have simple passwords that are easy to guess. Attacks on organizations have become more complex over the years, however basic attacks, such as email phishing, that can be done by almost anyone are still a rather effective way of gaining access to an organizations most sensitive information.Multi-factor authentication is the process of identifying users by validating two of more characteristics that are unique to that users
Multi-factor authentication has evolved as the single most effective control to insulate an organization against remote attacks, and when implemented correctly (‘correctly’ being the key word), can prevent most attackers/threats from easily gaining an initial foothold into your environment.With so many MFA products out there, why use Azure MFA? It has most features that other leading MFA services offer, however I feel it’s the integration with the Microsoft Azure services as well as 3rd party applications that set it apart from other MFA services.
In the following blog, I will be discussing Microsoft interpretation of Multi Factor Authentication, requirements from a licensing perspective and finally the steps required within Azure to configure this.As I mentioned earlier, the definition of Multi Factor Authentication is when a user is granted access only after successfully presenting two or more pieces of evidence to an authentication mechanism. This can be explained in a very simple and clever way:
Something you know (typically a password)
Something you have (a trusted device that is not easily duplicated, like a mobile phone)
Something you are (biometrics like fingerprint or face)
Azure Multi-Factor Authentication helps protect access to data and applications with strong authentication via a range of different authentication methods:
Password: A users Azure AD password is considered an authentication method, one that cannot be disabled!
Security Questions: these are only available in Azure self-service password reset (SSPR) to non admin accounts. The questions can be less secure than other methods, so Microsoft recommend using them in conjunction with another method. There are many predefined questions to chose from, examples of which are:
In what city did you meet you first spouse?
What is your favourite food?
In what city was your mother born?
What is your father’s middle name?
Email Address: Microsoft recommends the use of an email account that would not require the user’s Azure AD password to access.
Microsoft Authenticator App: the Microsoft Authenticator app is available for Android, iOS and Windows Phone.
OATH hardware tokens: This open standard specifies how one-time password (OTP) codes are generated. Azure AD supports the use of OATH-TOTP SHA-1 tokens of the 30-second or 60-second variety.
SMS: Text message is one of the two phone authentication methods. An SMS is sent to a mobile phone number containing a verification code. The user must enter this verification code in the sign in page to continue.
Phone Call: This is the second phone authentication method. An automated voice call is made to the phone number provided. The user must answer the call and follow the automated instructions to continue. In both the Phone call and the SMS methods the mobile number is configured in the users Azure AD account.
App Password: App passwords come in handy with certain non-browser apps that do not support multi-factor authentication, however applications that use conditional access policies to control access do not need app passwords.
Licensing Requirements: Multi-Factor Authentication comes as part of the following offerings:
Azure Active Directory Premium or Microsoft 365 Business – Full featured use of Azure MFA using Conditional Access policies.
Azure AD free or standalone Office 365 licenses – Use pre-created conditional access baseline protection policies to require MFA for your users and Administrators
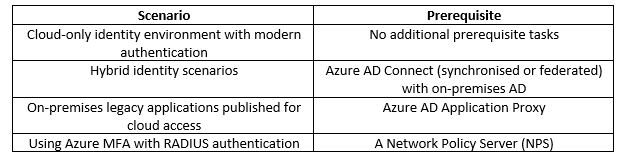
Before starting an MFA deployment in Azure there are prerequisite items that should be considered.
Microsoft recommend using Conditional Access to define their network using named locations. If your organization is using identity Protection, consider using risk-based policies of named locations. To configure a named location:
Open Azure AD in the Azure portal
Click Conditional Access
Click Named Locations
Click New Location and enter a meaningful Name
Select whether you are defining the location using IP ranges or Countries/Regions
Click Create
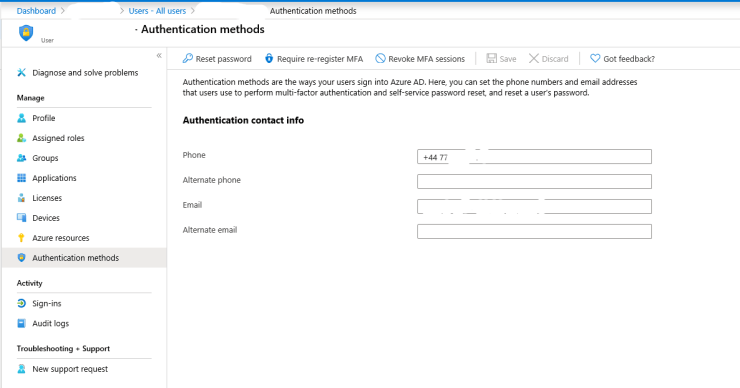
If using IP ranges decide where to make the location as trusted and specify the IP range. To enable MFA for users, in the Azure AD portal:
Go to all users
click on the Multi-Factor Authentication button
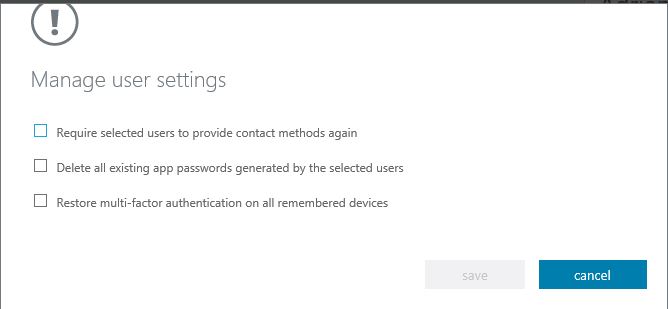
From this window you can manage user settings either on an individual basis or bulk number of users. The settings available are shown in the below image:
You can also enable is disable the users MFA status. There is also a ‘Service Settings’ tab where you can configure the following settings:
App Passwords
Trusted IPs
Verification Options
Remember Multi-Factor Authentication
App Password: With this setting you can either allow or not allow users to create app passwords to sign to non-browser apps
Trusted IPS: With this setting you can specify IP addresses or full subnets where you want to bypass MFA. This maybe trusted offices within your business or locations where you don’t want the MFA policy to apply.
Verification Options: With this setting you can specify the verification options you want available to users:
Call to phone
Text message to phone
Notification through mobile app
Verification code form mobile app or hardware token
Remember multi-factor authentication: You can specify if you want to allow users to remember MFA on devices they trust for a certain amount of days before they need to re-authenticate.
In summary, Azure MFA should be one of the first items you enable and configure in your Office 365 tenant to ensure a secure environment. Hope you find this helpful, if you would like any more information feel free to tweet me @shabazdarr or ask a question in the comments section below!
In part one of this series I will go through an overview of the title topic, what requirements you need to meet for this feature, a brief description of the setup tasks you need to complete (I will go into full detail in part two of this series) and the benefits this feature can offer you as a business.
Overview: Earlier this year Veeam released version 9.5 Update 4 of their Backup & Replication product, and with this new release they have introduced the capability to scale out your on premises repository to cloud object storage including Azure Blob. The new feature allows backup admins to archive older backups into Azure blob storage by adding it into Veeam as a ‘Scale-out Repository’ rather than a standard backup repository. Most companies will already be backing up there data offsite in some shape or form (if you are not you should be!!), either in a secondary site owned by them or to a Service provider. In the first instance it requires you to have a building in a geographically separated location with some sort of Infrastructure in place. This type of setup can be very costly from a financial and time perspective, however Cloud object storage takes a lot of this away. In the second instance, Service Providers do take the headache of day to day management away, however I believe would struggle to match the cost efficiency of public cloud object storage.
Requirements: Before you can go ahead and utilize this feature you need to meet certain prerequisite requirements:
Ensure Veeam Backup & Replication is updated to 9.5 update 4
As mentioned this is a new feature which is only currently available in update 4 of version 9.5 so this should really be your first step on this journey
A pay as you go or CSP Azure Subscription
You will need to have an existing Azure subscription where you can create the storage required for this feature to work. If you are able to get your subscription via a CSP partner I would recommend doing this as it works out cheaper than using the standard pay as you go subscription.
Setup Tasks: You should be at the point where you have now successfully upgraded your on premises Veeam Backup & Replication management software to 9.5 update 4 and provisioned an Azure subscription. Other initial setup tasks include creating a storage account in Azure, provisioning the Blob container you will archive the backups in, add a scale-out repository pointing at the Azure blob and finally re-configuring your existing Veeam backup jobs to archive your backups to the blob storage.
Pros and Cons: Like everything in this world there are two sides to it, and really its about what suits you as the individual company. For me this latest feature has the following positives:
Cost Effective – If you host your own offsite storage or use a service provider, Azure Blob storage costs will be more cost effective than both of these
HA & better redundancy – your own Infrastructure or Service Providers cannot compete with the high availability and redundancy offered by Microsoft Azure. A lot of Service Providers will claim they can, but in reality losing more than one Data Center would be catastrophic, where as Microsoft could cope with potential multiple DC failures.
Scale out to Cloud: For companies that need to keep older backups but do not necessarily want to spend additional on premises storage, this feature is ideal and allows you to scale and extend your on premises storage into the cloud.
And the cons:
Potential Compliance issue: This all depends on your companies compliance policies when it comes to data, and using public cloud may not be an option due to this.
So it turned out to be ‘con’ rather the the plural but that’s my point, this latest feature has more positives than negatives.
That is it for part one, keep an eye out for part two where I will go into more details on how to configure the both the Azure Blob Storage and Veeam Backup jobs for this feature. Until next time, ‘IamITGeek’ over and out!
For those who are new to the blog, welcome, and to those returning a big thanks! In part one of this series ( https://iamitgeek.com/?p=145 ) I discussed the Veeam Cloud Connect offering within Azure for Service Providers, some of the requirements as well as the initial configuration within Azure portal. In part two I will walk through the configuration of Veeam Cloud Connect and some of the different options that can be offered to customers.
Veeam Cloud Connect Service
I finished the previous post at the point where we had provisioned the virtual machine. Once this process is completed you need to ensure the version of Veeam Backup & Replication installed on premises matches the version installed in Azure, and as I mentioned the version currently available within Azure is 9.5 update 3 which is not the latest version. After upgrading Veeam, we are ready to start configuring the Veeam Cloud Connect Service Provider platform.
When you initially login to the Azure virtual instance the Veeam Cloud Connect Wizard will automatically start. To proceed any further you will need your Service Provider license which you should be sent once you have registered with Veeam for the Service Provider rental agreement. The rest of the wizard then takes you through the steps you need to follow in the Veeam Backup & Replication software both on-premises and Azure. The steps include the following:
Configure Cloud Gateway in Azure: Customers, or ‘tenants’ do not communicate with the repositories in Azure like they do when dealing with an on premises Veeam server. Instead the Cloud Gateway is used to mask the repositories so they make a connection (by default over port 6180) to the service provider cloud gateway. You will need to ensure you configure a DNS name on the Azure virtual machine before you can do this.
Configure Cloud Repository on the Azure Virtual Machine: This needs to be a location on an attached disk where you will store all your tenants backups. You may need to create some storage within the Azure platform and attach it to the virtual machine before you can do this.
Configure Tenants in Azure: You will need to configure a tenant username, password and repository within your main backup location for each customer. Most important part of this is ensuring you document credentials for each tenant as these are needed when configuring the backup job on premises.
Add the Service Provider on-premises: In Veeam Backup & Replication you need the customer to add you as a service provider. You will need to give them your Cloud Gateway FQDN and the port (6180) and they will need to ensure that this port is allowed outbound to ensure Veeam can communicate with Cloud Connect platform in Azure.
At this point the majority of the configuration is completed, however we are still not ready to send data into the Azure platform. Before we can do this we need to ensure the transfer of data is secure, which is done by installing and configuring an SSL certificate which will allow you to encrypt data in transit so customers data is secure whilst being backed up.
Data Encryption
The final part is to setup the backup jobs so the customer can start backing up data to the Veeam Cloud Connect service hosted in Azure. With the backup configuration you have the exact same features you would with an on premises backup job, including the notification features as well as scheduling.
The main benefit of the Azure offering of the Veeam Cloud Connect service is that not all Managed Service Providers have the luxury of being able to host a private data center where they can house the amount of Infrastructure required for a good size Veeam Cloud Connect Service. The Azure offering takes care of that issue and more, as with most private cloud services you get the added redundancy, durability and availability of the Microsoft Azure Data Center. Also Azure have added disk sizes that makes it a much more scalable cloud provider offering.
That concludes my blog series on Veeam Cloud Connect in Azure, I hope you enjoyed this series and I would love to know what you thought so please feel free to leave a comment in the comments section. Until next time, ‘IamITGeek’ over and out!
For those who are new to the blog, welcome, and to those returning a big thanks! In this weeks blog series I will be taking a closer look into utilizing Azure IaaS for backing up, in particular the Veeam Cloud Connect Service in Azure.
Veeam Service in Azure
This service is more applicable if you are a Managed Service Provider (MSP) as it allows you to host your customers backups on a multi-tenanted platform, offsite into the public cloud. Most IT professionals will have heard of Veeam and its range of products as they are one of leading vendors when it comes to data backup and replication. In part one of this series I will discuss the requirements as well as the initial configuration steps within Azure.
Veeam Cloud Connect in Azure Overview
The above diagram shows an overview of how the Veeam Cloud Connect service looks. As you can see you have multiple customers backing data over an SSL connection to cloud repositories in Azure. To be in a position to use this service, the end user/customer needs to meet the following prerequisites:
A Veeam Backup & Replication server is deployed and functioning in their on-premises infrastructure
The infrastructure is running on Microsoft Hyper-V or VMware (Veeam Agent for Windows is also supported for physical Windows servers)
The Veeam Backup & Replication Server has an Internet Connection
I will not be covering it in this blog but Backing up Office 365 mailboxes using Veeam Cloud Connect is also supported. For a Managed Service Provider to be able to offer this service they must meet the following prerequisites:
A current Azure tenant subscription
Is a Veeam Cloud Service Provider and has signed a rental agreement
Before going into the steps required to configure this service lets go through some of the key roles and concepts:
Roles and Concepts: The communication in Azure is between two parties, the Service Provider and the tenant. The Service Provider is the organization that provides the cloud infrastructure (mainly the repository) to the tenants, and the tenant is the customers who send data off site and stores their backups in the cloud infrastructure.
In Azure, the Service Provider needs to perform the following tasks:
Configure the Veeam Cloud Connect Infrastructure
Create the relevant backup repositories
Setup SSL certificates to allow for data encryption in transit
Create Cloud Gateways
Create and document the tenant user accounts
The customer (or in this case ‘tenants’) need to perform the following tasks:
Connect to the Azure hosted Veeam Cloud Connect platform from their on-premises Infrastructure.
Configure backup jobs targeted at the Veeam Cloud Connect repository
To get started with the Veeam Cloud Connect service in Azure you need to provision the virtual machine first via the ‘Azure Marketplace’. Now you have two options and it all depends on your requirement. If you are an Enterprise level company wanting to extend your backups offsite into Azure then ‘VCC for the Enterprise’ is the correct choice. For Managed Service Providers (MSP) who wish to run a multi tenanted solution in which they can send multiple customers backups into Azure then ‘VCC for Service Providers’ is what they require and that is what I went for.
Veeam Cloud Connect for Service Providers
One thing to note is the current version in the bottom left. As of the time of me writing this post, the latest version of Veeam is 9.5 update 4a which means the version in Azure is out of date. This means that if you are good with your patching and your on premises Veeam services are at the latest version you will need to update the version in Azure once the virtual machine is provisioned.
When you click on ‘Create’ it then takes you to create a virtual machines where you can select the relevant configuration including:
Virtual Machine name
Azure Region
Resource Group
Size
Administrator username and Password
That is it for part one, keep an eye out for part two where I will go into more details configuring the Veeam Cloud Connect Platform. Until next time, ‘IamITGeek’ over and out!
For those new to the blog welcome, and to those returning a big thanks! In part one of this series on ‘Azure Autopilot with Intune’ (https://iamitgeek.com/?p=123) I discussed what the Autopilot Service is, prerequisite requirements for this service and finally how to set it up.
In part two of the series I will now go through some of the user experience when logging onto a device that is added to the Autopilot Service as well as some features around the Intune profile you can setup to help manage the Windows 10 devices. As I have mentioned in previous blogs, I will be doing a separate series around ‘Intune Application deployment’ as its too big a topic to include here even though it has a big part to play with the Autopilot service.
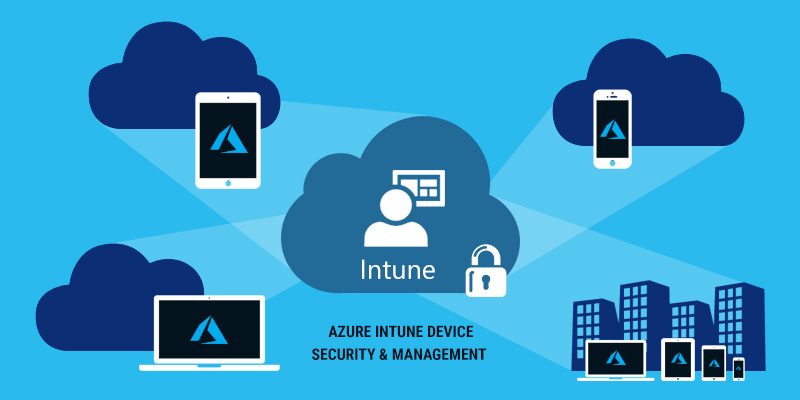
Before any user’s login we really need to ensure that the device will be secure for them to use. Security of the device is controlled through the ‘Device Compliance’ section on the Intune portal and in here is where you can create policies for the different device types (Windows, Android, MAC and so on).
Device Compliance
If you click on Policies > Create Policy, you can create your platform specific compliance settings your devices must meet to be allowed access to your corporate network. In this instance we need a Windows 10 compliance policy, however those who are familiar with the blog post I did on ‘Samsung Knox Enroll with Intune integration’ will see the settings you can configure for Windows 10 devices are very similar.
Policy Settings
We have the Setting section which has:
Device Health
Device Properties
Configuration Manager Compliance
System Security
Windows Defender APT
Device Health: Here you can configure if Bit locker encryption and Secure boot are required or not. Device Properties: You can specify the minimum and maximum OS level on your Windows devices. This isn’t really as significant as it is for mobile phone devices, however you may have an application that can only run on a specific build of Windows 10, so with this part of the policy you can ensure your devices meet that requirement. System Security: Here we configure the password requirement settings, including Password length, maximum minutes of inactivity, number of previous password and password type to name a few. Windows Defender APT settings are specific to Windows 10 and it lets you specify what minimum risk level the device needs to be at to be compliant. The final and in my opinion the most important setting is ‘Actions of non-compliance’ which defines what actions need to be taken for devices that do not meet the compliance policy requirements. The two actions around this are ‘Send email to end user’ or ‘Remotely lock the non compliant device’.
End User experience : After the compliance policy is set you are now in a position for the end users to login. The great thing about Autopilot service is that it allows the end user to have that out of box experience (OOBE) where they can remove the laptop from the original packaging and box as if they have just been out and purchased the laptop themselves, rather than have it handed over from IT with little marks on it from where IT have been using it to install the OS and configure the apps. The end user will need to choose the language, time/date, accept the license agreement and connect it to the Internet (via Wi-Fi). Once this is connected to the Internet the device makes that connection with the Autopilot service which already knows about this device as we imported it right at the start. It then loads a company specific login page that you can configure within Azure which includes your company name, logo and IT support contact details. The user then logs in with their corporate email address and Autopilot starts to install the compliance policy as well as any apps you have provisioned. The beauty of this is that there is no or very little management needed from IT, and rather than spend time on deploying devices, they can spend time working on the compliance and applications side.
That concludes my blog series on Autopilot with Intune folks, I hope you enjoyed this series and I would love to know what you thought so please feel free to leave a comment in the comments section. Until next time, ‘IamITGeek’ over and out!
For those who are new to my blog welcome! To those who are returning, a big thanks!! I recently did a two part series on Samsung Knox enrollment with Intune Integration which went through the steps needed to enroll Samsung mobile devices to the Azure Intune portal and then how to manage the devices via Intune.
This weeks ‘IamItGeek’ blog series is going to be on a similar topic: Using Azure Autopilot to enroll Windows devices into an Azure AD domain and then how you can manage the Windows device with Intune.
What is Autopilot? I have found one incorrect assumption made around Autopilot is that its a cloud based imaging service, however it is in fact a collection of technologies used to setup and pre-configure new Windows 10 devices. Now these could be devices purchased direct from vendors like Lenovo and Dell or even devices obtained via high street shops like PC World and Curries.
Requirements: Before you can use this service however there are a number of pre-requisites that need to be met:
Windows 10 version 1703 or higher
Windows 10 Pro, Pro Education, Pro for Workstation, Enterprise and Education are all Autopilot supported platforms
Relevant Subscription
To allow enrollment into the Azure Intune MDM service you need to ensure the users corporate Azure account has the correct subscription. Relevant Subscriptions include: Microsoft 365 (Business Subscription), Microsoft F1, Academic A1, A3 and A5, Microsoft Enterprise E3 and E5, Intune for Education, Azure AD P1 and P2, and any Microsoft Intune subscription.
One final requirement is needed before you can provision which is a set of device details that includes:
Device Serial Number
Windows Product ID
Hardware Hash
This information can be obtained in a few different ways and this all depends on how you purchase the devices. If you have purchased via the vendor, they can and should provide this which would make the process a lot easier. If however you are not able to do this you will need to login to the device and use Powershell to extract this information. I used the the following commands within Powershell to output a file with the information and then reset the device to OOBE (Out Of Box Experience):
Once you have the csv file output you then need to import/upload this into the Azure Intune Portal
Windows 10 Enrollment
As you can see from the image above, you need to upload the csv by going to Windows enrollment > Devices and then importing the file into Intune
Import Autopilot Hardware csv
Once the import is started it can take some time depending on how many devices, however once this is completed you can start to build your security profiles and applications that will be deployed via Autopilot when the users first login to Windows.
That is it for part one, keep an eye out for part 2 where I will go into more details around creating and Autopilot profile and the end user experience when logging into the device for the first time. Until next time, ‘IamITGeek’ over and out!
For those who are new to my blog Welcome, and to those that are returning a big thanks!! In my last blog ( https://iamitgeek.com/?p=95 ) I went through Samsung Knox Enroll and what is required to integrate this with Azure Intune MDM. In part two of that series I will take a closer look at what you can do within Intune to deploy security policies and applications to the devices once they are enrolled.
At this point we have successfully enrolled our device into Intune via the Samsung Knox Enroll service so we should be able to see our mobile device in the Azure Intune portal. You can confirm this by going to going to Devices > All Devices within the Intune portal.
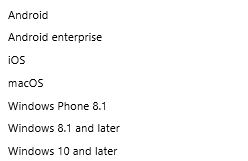
As with all devices that are going to store company data on, security is key. Intune uses Device Compliance policies to deploy security to its enrolled devices and supports the following platforms:
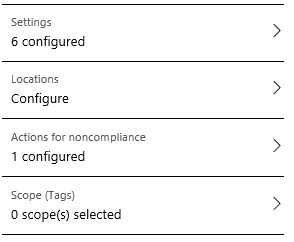
The purpose of the compliance policy is to ensure devices meet a certain criteria before they are authorized to access and store company data. At the same time if any existing devices become non-compliant you are also alerted about this. You create the policies within Device Compliance > Policies > Create Policy. In this case my requirement is to create a policy for Android devices. The initial configuration required is straight forward: Policy name, description and choose your platform. We then get four additional options –
Android Compliance Policy options
First option is ‘Settings’ which again gives us three sub options of: ‘Device Health’, ‘Device Properties’ and ‘System Security’. Device Health allows you to configure Device Threat level, block ‘rooted devices’ and add protection around Google play. The Device Properties option allows you to specify a minimum and maximum OS version which is a great feature if you have applications you wish to deploy that need a specific OS version. The third option, System Security is what I would say would be most commonly used settings that would be configured as its all based around passwords, encryption and device security. Finally you need to set an action for noncompliance, which basically tells Intune what do to if the device ever becomes non-compliant. The three available actions are:
Mark Device as non-compliant
Remotely Lock Device
Send Email to end user
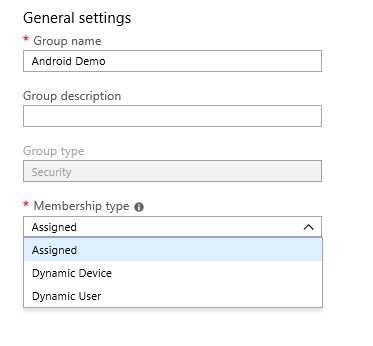
Once the Compliance Policy is ready you then need to create a security group and assign this group to the policy.
Security Group
The feature to understand when creating a security group in Intune is the Membership type, and as you can see from the image above there are three:
Assigned
Dynamic User
Dynamic Device
In an Assigned group you can manually assign members whereas in a Dynamic User and Device group it is created with a specific query (User based and Device based respectively). In my case I created an assigned group and added my test account and Samsung device which was already enrolled into Intune. Once you have setup the compliance policy you then need to wait for your device to synchronize with Intune and download the policy to see if its compliant or not, and depending on what you configured in the ‘Actions for noncompliance’ section Intune will either lock the device, send an email or just simply mark the device as non-compliant in the portal.
When you are happy with the security and compliance of the device you can then start to look at deploying applications. There is a whole host of application types as you shown in the image below:
Application Types
During my testing I was able to successfully deploy an Android Application and a ‘Managed by Google Play’ application. I will not cover deploying applications in this blog as it deserves its own series (coming soon!!), however much like the compliance policies you can also deploy specific apps to specific groups of users and devices.
That concludes my blog series on Samsung Knox Enroll with Intune integration folks, I hope you enjoyed this series and I would love to know what you thought so please feel free to leave a comment in the comments section. Until next time, ‘IamITGeek’ over and out!