Azure Autopilot with Intune – Part Two — April 11, 2019

Azure Autopilot with Intune – Part Two

Salaam, Namaste, Ola and Hello!

For those new to the blog welcome, and to those returning a big thanks! In part one of this series on ‘Azure Autopilot with Intune’ (https://iamitgeek.com/?p=123) I discussed what the Autopilot Service is, prerequisite requirements for this service and finally how to set it up.

In part two of the series I will now go through some of the user experience when logging onto a device that is added to the Autopilot Service as well as some features around the Intune profile you can setup to help manage the Windows 10 devices. As I have mentioned in previous blogs, I will be doing a separate series around ‘Intune Application deployment’ as its too big a topic to include here even though it has a big part to play with the Autopilot service.

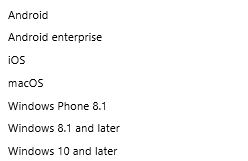
Before any user’s login we really need to ensure that the device will be secure for them to use. Security of the device is controlled through the ‘Device Compliance’ section on the Intune portal and in here is where you can create policies for the different device types (Windows, Android, MAC and so on).

Device Compliance

If you click on Policies > Create Policy, you can create your platform specific compliance settings your devices must meet to be allowed access to your corporate network. In this instance we need a Windows 10 compliance policy, however those who are familiar with the blog post I did on ‘Samsung Knox Enroll with Intune integration’ will see the settings you can configure for Windows 10 devices are very similar.

Policy Settings

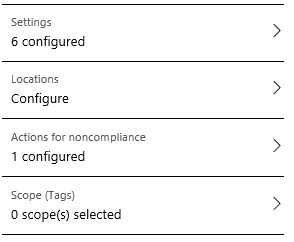
We have the Setting section which has:

  • Device Health
  • Device Properties
  • Configuration Manager Compliance
  • System Security
  • Windows Defender APT

Device Health: Here you can configure if Bit locker encryption and Secure boot are required or not. Device Properties: You can specify the minimum and maximum OS level on your Windows devices. This isn’t really as significant as it is for mobile phone devices, however you may have an application that can only run on a specific build of Windows 10, so with this part of the policy you can ensure your devices meet that requirement. System Security: Here we configure the password requirement settings, including Password length, maximum minutes of inactivity, number of previous password and password type to name a few. Windows Defender APT settings are specific to Windows 10 and it lets you specify what minimum risk level the device needs to be at to be compliant. The final and in my opinion the most important setting is ‘Actions of non-compliance’ which defines what actions need to be taken for devices that do not meet the compliance policy requirements. The two actions around this are ‘Send email to end user’ or ‘Remotely lock the non compliant device’.

End User experience : After the compliance policy is set you are now in a position for the end users to login. The great thing about Autopilot service is that it allows the end user to have that out of box experience (OOBE) where they can remove the laptop from the original packaging and box as if they have just been out and purchased the laptop themselves, rather than have it handed over from IT with little marks on it from where IT have been using it to install the OS and configure the apps. The end user will need to choose the language, time/date, accept the license agreement and connect it to the Internet (via Wi-Fi). Once this is connected to the Internet the device makes that connection with the Autopilot service which already knows about this device as we imported it right at the start. It then loads a company specific login page that you can configure within Azure which includes your company name, logo and IT support contact details. The user then logs in with their corporate email address and Autopilot starts to install the compliance policy as well as any apps you have provisioned. The beauty of this is that there is no or very little management needed from IT, and rather than spend time on deploying devices, they can spend time working on the compliance and applications side.

That concludes my blog series on Autopilot with Intune folks, I hope you enjoyed this series and I would love to know what you thought so please feel free to leave a comment in the comments section. Until next time, ‘IamITGeek’ over and out!

Samsung Knox Enroll with Azure Intune MDM – Part 2 — April 3, 2019

Samsung Knox Enroll with Azure Intune MDM – Part 2

Salaam, Namaste, Ola and Hello!

For those who are new to my blog Welcome, and to those that are returning a big thanks!! In my last blog ( https://iamitgeek.com/?p=95 ) I went through Samsung Knox Enroll and what is required to integrate this with Azure Intune MDM. In part two of that series I will take a closer look at what you can do within Intune to deploy security policies and applications to the devices once they are enrolled.

At this point we have successfully enrolled our device into Intune via the Samsung Knox Enroll service so we should be able to see our mobile device in the Azure Intune portal. You can confirm this by going to going to Devices > All Devices within the Intune portal.

As with all devices that are going to store company data on, security is key. Intune uses Device Compliance policies to deploy security to its enrolled devices and supports the following platforms:

The purpose of the compliance policy is to ensure devices meet a certain criteria before they are authorized to access and store company data. At the same time if any existing devices become non-compliant you are also alerted about this. You create the policies within Device Compliance > Policies > Create Policy. In this case my requirement is to create a policy for Android devices. The initial configuration required is straight forward: Policy name, description and choose your platform. We then get four additional options –

Android Compliance Policy options

First option is ‘Settings’ which again gives us three sub options of: ‘Device Health’, ‘Device Properties’ and ‘System Security’. Device Health allows you to configure Device Threat level, block ‘rooted devices’ and add protection around Google play. The Device Properties option allows you to specify a minimum and maximum OS version which is a great feature if you have applications you wish to deploy that need a specific OS version. The third option, System Security is what I would say would be most commonly used settings that would be configured as its all based around passwords, encryption and device security. Finally you need to set an action for noncompliance, which basically tells Intune what do to if the device ever becomes non-compliant. The three available actions are:

  • Mark Device as non-compliant
  • Remotely Lock Device
  • Send Email to end user

Once the Compliance Policy is ready you then need to create a security group and assign this group to the policy.

Security Group

The feature to understand when creating a security group in Intune is the Membership type, and as you can see from the image above there are three:

  • Assigned
  • Dynamic User
  • Dynamic Device

In an Assigned group you can manually assign members whereas in a Dynamic User and Device group it is created with a specific query (User based and Device based respectively). In my case I created an assigned group and added my test account and Samsung device which was already enrolled into Intune. Once you have setup the compliance policy you then need to wait for your device to synchronize with Intune and download the policy to see if its compliant or not, and depending on what you configured in the ‘Actions for noncompliance’ section Intune will either lock the device, send an email or just simply mark the device as non-compliant in the portal.

When you are happy with the security and compliance of the device you can then start to look at deploying applications. There is a whole host of application types as you shown in the image below:

Application Types

During my testing I was able to successfully deploy an Android Application and a ‘Managed by Google Play’ application. I will not cover deploying applications in this blog as it deserves its own series (coming soon!!), however much like the compliance policies you can also deploy specific apps to specific groups of users and devices.

That concludes my blog series on Samsung Knox Enroll with Intune integration folks, I hope you enjoyed this series and I would love to know what you thought so please feel free to leave a comment in the comments section. Until next time, ‘IamITGeek’ over and out!

Samsung Knox Enroll with Azure Intune MDM – Part 1 — April 1, 2019

Samsung Knox Enroll with Azure Intune MDM – Part 1

Salaam, Namaste, Ola and Hello!

On this weeks ‘IamITGeek’ blog series I will be taking a in-depth look at Samsung Knox Enroll and how it integrates with Azure Intune to enroll & manage Samsung devices, as well as some of the cool ways in which you can utilize Azure Intune to deploy applications and security profiles to your mobile devices.

Samsung Knox Enroll: Samsung have a number of different services within the Knox suite including Knox Configure which allows you to configure profiles for devices and Knox Manage which is there full MDM solution. As with most third party MDM solutions they have a cost associated with them, however for existing Microsoft Intune customers you can utilize Knox Enroll which is a free service that allows you to automate the enrollment of Samsung (Android devices) into the Azure Intune MDM platform.

Before I used Knox Enroll, my previous experience with enrolling devices into Intune was manual and included having to download the Corporate Intune app from play store. In this blog i will take you through the integration of Samsung Knox Enroll with Intune which removes this obstacle, as well as how to deploy applications and security profiles to the devices from Intune once they are enrolled (In part two of this series).

Before you can configure the integration between Knox Enroll and Intune you need to first signup to Samsung Knox which is a relatively straight forward process. The only slight frustrating part of this is that you have to apply for the Enroll service which can take 2-3 days to go through. Once you are past that you are into the dashboard.

Samsung Knox Dashboard

As you can see from the image above once in the Dashboard you can start to access a number of services, some of which I mentioned earlier. Once in the Knox Mobile Enrollment Console you need to create an MDM profile. In this section we are basically configuring the integration with Intune which will allow for the auto enrollment into the MDM.

At this point I found the documentation available around configuring Knox Enroll profile with Intune was very poor and it took a lot of searching around various articles to find the correct information. After some trial and error the following fields were required to get the integration to work:

  • Profile name
  • Support Contact Details
  • MDM agent APK

The Profile name and support contact are very self explanatory, but the key is the MDM agent APK. This basically points Samsung Knox Enroll to the apk file for Azure Intune in the app store, which means the end user does not have to manually download it. At this point the slight confusion for me was not having to use the MDM uri, and looking for this originally did waste a lot of time. As I mentioned there does not seem to be much in technical documentation around how to set this up, where as there is a lot of information around an overview of the product and integration.

You will now need to add your device into the Samsung Knox portal. There are two methods around this:

  • Get a reseller to bulk add devices
  • Add a single device via Bluetooth

There is a section within the Admin console you can add a reseller which will then allow them to bulk add devices to your Samsung Knox portal. This method is more relevant if you are doing a mass roll out, however for the purpose of this blog I used the Bluetooth method which was straight forward and done via KDA (Knox Deployment App). This is a free download via the play store, however you need to make sure the following are in place before you can use this feature:

  • Must have a Samsung Knox Enroll login
  • Devices must support NFC or Bluetooth
  • Must have at least one profile configured in Samsung Knox Enroll

Once the device is added to the portal you can assign it the relevant profile which will then allow the enrollment into Intune process start. From a user perspective/experience, when they power on there device they will see a splash page which will show the support details we configured in the MDM profile earlier as well as a login prompt where they will need to use there Corporate Email details (Office 365/Azure) which will then add the device into the Intune MDM where the device will start to download any apps and security profiles configured within Azure.

That is it for part one folks, keep an eye out for part two where I will discuss some of the features around app deployment and security profiles within Intune that can be deployed to Samsung phones and how to do this. Until next time, ‘IamITGeek’ over and out!