Starting my own YouTube Channel – How and Why? — November 16, 2020

Starting my own YouTube Channel – How and Why?

Salaam, Namaste, Ola and Hello!

I have recently started my own YouTube Channel called ‘I am IT Geek’ where I have started to publish video series all around different Microsoft Cloud services – https://www.youtube.com/channel/UCt5sNdu14RterwDfEDEJidQ . It has so far been an amazingly fun experience and I thought I would get my experience down on paper in a blog in case anyone else within the wider online IT community wants to start there own and was not sure how!

Where it all started!?

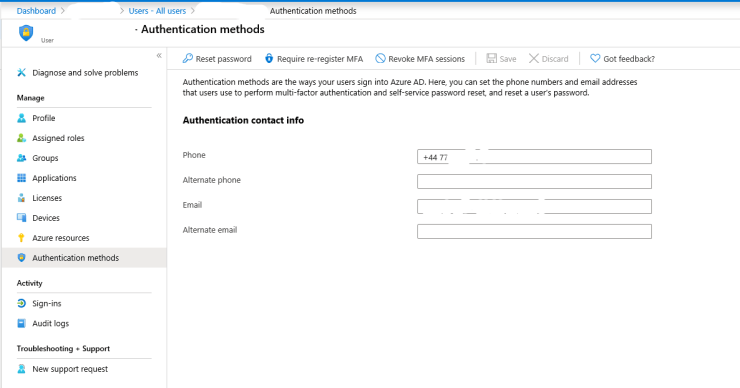
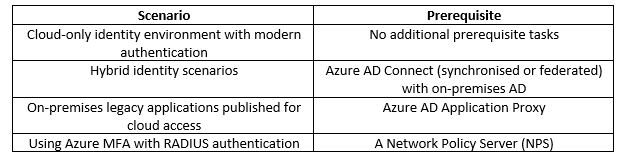
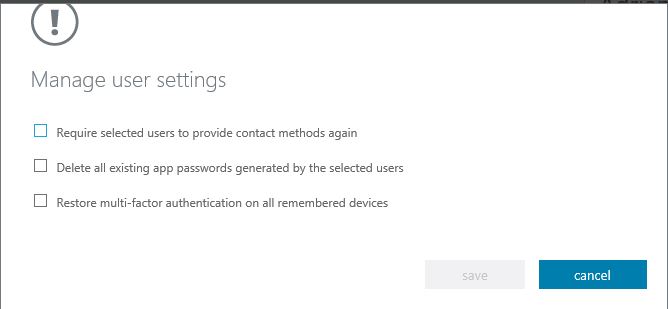
Almost 12 months ago I took part in the Azure Advent Calendar Azure community initiative where I did a video based on Multi-Factor Authentication – https://www.youtube.com/watch?v=thep3IYzg2k . This was the first time I had dipped my toe into the video content world and it was awfully painful. I spent most of the day recording (a good 8 hours) and found the whole experience of being in front of camera very stressful. The equipment I used at the time was owned by my employer at the time and was pretty good and included a camcorder and multiple mics for optimum sound. The saying ‘All the gear and no idea’ comes to mind and with this being my first experience it was very much the case!

What little did I know that recoding the content was probably the easy part and the fun of editing was to come! Much like the recording of the actual video, at the time it was my first experience editing video content as well. I was lucky enough at the time that a good friend of mine, Neil Roberts, was kind enough to loan me his MAC Book laptop which had some amazing free video editing software on it. I spent hours editing and all in all it was a vey traumatic experience.

I decided at that point that I was not ready to make video content, however less than one year on things have changed! Where as with this fist video, I jumped into it without really doing any research into equipment, watching how other people in the community record theirs or even what software is needed. I made sure I did all of these things this time around and it has made a lot of difference.

Why start video content?

I have been contributing to the Azure and Microsoft communities with mainly blog posts and occasionally taking part in some of the community initiatives like the Azure Spring Clean and the Azure Back to school, however these have again all been blog based. I wanted to contribute more so back in July I presented at my first Azure User Group (Leeds Azure User Group) and due to the COVID situation it was virtual. It was the first time since the YouTube video I was presenting to people on camera and the experience was much different. Obviously there was no editing to be done, however I felt much more comfortable speaking on camera to people and I enjoyed preparing the slides! Since then I have presented at several more User Groups and the more I have done the more confident I have become. However I still felt like I wanted to contribute more, so what was left? Making video content!

How did I go about I differently this time?

As I mentioned earlier, once I made the decision to create YouTube content I invested time in looking into the right type of equipment first. Sound and video are vital so I reached out to others within the online Azure community to see what they had used. In the end I went with:

This mic had great reviews and was also within the budget I had set myself. It has honestly been a god send and removed a lot of the echo I was getting when trying to record without it!

This mic was also essential to making sure the quality of the content was clear. I was lucky enough to be given this as a gift from some friends earlier this year so it was perfect timing!

  • Software: The first time I was loaned a MAC Book with some free video editing software on it, however I did not have that luxury now. I once again looked to the always helpful online Azure community for advice and I have been using a combination of OBS Studio to record the content and CyberLink Power Director to edit the videos before uploading them into YouTube. OBS studio is free however Power Director is not free. A lot of people recommended Camtasia, however this was again outside my budget, but this may be something I look at using in the future.
  • Branding: Another aspect I believe to be important but maybe not all people will agree is ensuring you get good branding done. I had been recommended to use an artist called Mary Crews – https://twitter.com/MaryCrewsGFX to get my logo, banner and intro video done and the output was amazing. Having a reliable and talented artist to create the designs and branding was what I believe really helped finish off my channel and presentation content.

Having all the correct kit and branding is of course all pointless if you don’t have any content to share! During my research I watched a lot of channels, including Gregor Suttie’s – https://www.youtube.com/channel/UC6Z6po-HoVP6NEp88KYXSPw, Derek Campbell – https://www.youtube.com/user/Delboy3g and Dwayne Natwick – https://www.youtube.com/channel/UCIWicD_sUxH6EMH4ndG5NxQ to name a few. They all had different methods of sharing content, Derek does more podcast style interviews, Gregor does short, very helpful videos on how to configure and fix cloud related services and Dwayne does video series on a specific topic and breaks them down into episodes. I decided I would do a mixture of all these on my channel at some point. At the moment I have started off by doing Video series based on different topics (currently the Azure MFA series), but I will also be doing some interview style videos as well as some quick short ‘how to’ and quick fix videos as well.

In summary this all really comes down to me wanting to share and contribute more to the Azure/Cloud online community, one that has given so much to me. I feel like I want to repay that and try to help others who are maybe starting on there IT journey like I once was.

Hope you find this helpful, if you would like any more information feel free to tweet me @shabazdarr or ask a question in the comments section below! Until next time, ‘IamITGeek’ over and out!

Azure Advent Calendar – Azure Multi Factor Authentication (MFA) — December 6, 2019

Azure Advent Calendar – Azure Multi Factor Authentication (MFA)

Salaam, Namaste, Ola and Hello! My name is Shabaz Darr and this is the 6th day of the Azure Advent Calendar ( https://azureadventcalendar.com ). One of my main focuses in my role is Security, which is why I have chosen Azure Multi Factor Authentication as my topic for this blog.

Account passwords are historically one of the easiest security measures to hack, be it via ‘Brute Force attacks’ or users have simple passwords that are easy to guess. Attacks on organizations have become more complex over the years, however basic attacks, such as email phishing, that can be done by almost anyone are still a rather effective way of gaining access to an organizations most sensitive information.Multi-factor authentication is the process of identifying users by validating two of more characteristics that are unique to that users

Multi-factor authentication has evolved as the single most effective control to insulate an organization against remote attacks, and when implemented correctly (‘correctly’ being the key word), can prevent most attackers/threats from easily gaining an initial foothold into your environment.With so many MFA products out there, why use Azure MFA? It has most features that other leading MFA services offer, however I feel it’s the integration with the Microsoft Azure services as well as 3rd party applications that set it apart from other MFA services.

In the following blog, I will be discussing Microsoft interpretation of Multi Factor Authentication, requirements from a licensing perspective and finally the steps required within Azure to configure this.As I mentioned earlier, the definition of Multi Factor Authentication is when a user is granted access only after successfully presenting two or more pieces of evidence to an authentication mechanism. This can be explained in a very simple and clever way:

  • Something you know (typically a password)
  • Something you have (a trusted device that is not easily duplicated, like a mobile phone)
  • Something you are (biometrics like fingerprint or face)

Azure Multi-Factor Authentication helps protect access to data and applications with strong authentication via a range of different authentication methods:

Password: A users Azure AD password is considered an authentication method, one that cannot be disabled!

Security Questions: these are only available in Azure self-service password reset (SSPR) to non admin accounts. The questions can be less secure than other methods, so Microsoft recommend using them in conjunction with another method. There are many predefined questions to chose from, examples of which are:

  • In what city did you meet you first spouse?
  • What is your favourite food?
  • In what city was your mother born?
  • What is your father’s middle name?

Email Address: Microsoft recommends the use of an email account that would not require the user’s Azure AD password to access.

Microsoft Authenticator App: the Microsoft Authenticator app is available for Android, iOS and Windows Phone.

OATH hardware tokens: This open standard specifies how one-time password (OTP) codes are generated. Azure AD supports the use of OATH-TOTP SHA-1 tokens of the 30-second or 60-second variety.

SMS: Text message is one of the two phone authentication methods. An SMS is sent to a mobile phone number containing a verification code. The user must enter this verification code in the sign in page to continue.

Phone Call: This is the second phone authentication method. An automated voice call is made to the phone number provided. The user must answer the call and follow the automated instructions to continue. In both the Phone call and the SMS methods the mobile number is configured in the users Azure AD account.

App Password: App passwords come in handy with certain non-browser apps that do not support multi-factor authentication, however applications that use conditional access policies to control access do not need app passwords.

Licensing Requirements: Multi-Factor Authentication comes as part of the following offerings:

  • Azure Active Directory Premium or Microsoft 365 Business – Full featured use of Azure MFA using Conditional Access policies.
  • Azure AD free or standalone Office 365 licenses – Use pre-created conditional access baseline protection policies to require MFA for your users and Administrators

Before starting an MFA deployment in Azure there are prerequisite items that should be considered.

Microsoft recommend using Conditional Access to define their network using named locations. If your organization is using identity Protection, consider using risk-based policies of named locations. To configure a named location:

  1. Open Azure AD in the Azure portal
  2. Click Conditional Access
  3. Click Named Locations
  4. Click New Location and enter a meaningful Name
  5. Select whether you are defining the location using IP ranges or Countries/Regions
  6. Click Create

If using IP ranges decide where to make the location as trusted and specify the IP range. To enable MFA for users, in the Azure AD portal:

  1. Go to all users
  2. click on the Multi-Factor Authentication button

From this window you can manage user settings either on an individual basis or bulk number of users.  The settings available are shown in the below image:

You can also enable is disable the users MFA status.  There is also a ‘Service Settings’ tab where you can configure the following settings:

  • App Passwords
  • Trusted IPs
  • Verification Options
  • Remember Multi-Factor Authentication

App Password:  With this setting you can either allow or not allow users to create app passwords to sign to non-browser apps

Trusted IPS: With this setting you can specify IP addresses or full subnets where you want to bypass MFA.  This maybe trusted offices within your business or locations where you don’t want the MFA policy to apply.

Verification Options: With this setting you can specify the verification options you want available to users:

  • Call to phone
  • Text message to phone
  • Notification through mobile app
  • Verification code form mobile app or hardware token

Remember multi-factor authentication: You can specify if you want to allow users to remember MFA on devices they trust for a certain amount of days before they need to re-authenticate.

In summary, Azure MFA should be one of the first items you enable and configure in your Office 365 tenant to ensure a secure environment.  Hope you find this helpful, if you would like any more information feel free to tweet me @shabazdarr or ask a question in the comments section below!